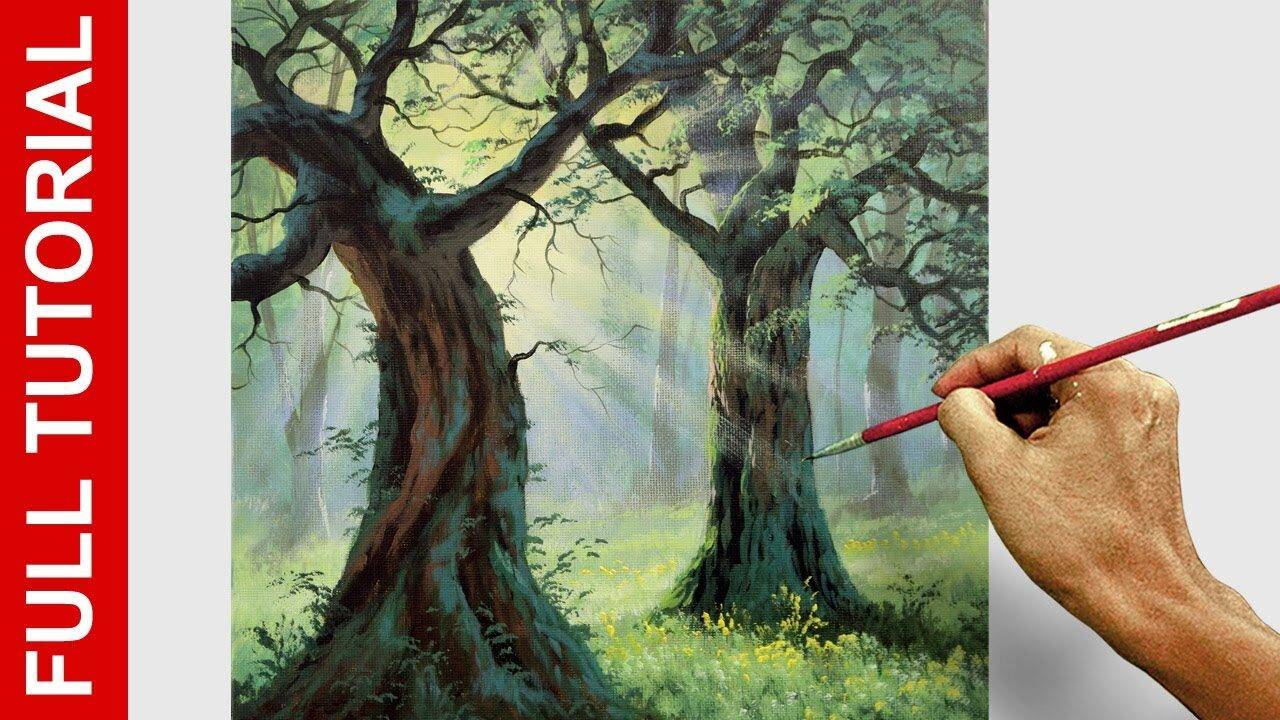
Step by Step TUTORIAL : Acrylic Landscape Painting / Trees in Forest with Sun Rays / JMLisondra
How to paint trees in forest with sun rays?
In this step-by-step acrylic landscape painting tutorial, you’ll learn how to paint trees in a forest with beautiful sun rays shining through the leaves. Follow along as I demonstrate how to create a glowing forest atmosphere with light, depth, and texture using acrylics.
Hello everyone! My name is John Magne Lisondra (JMLisondra), and today I’m excited to share a tutorial on how to paint this wonderful landscape: trees inside a forest emphasizing dramatic sun rays. This painting approach is designed to be simple, focusing on the sheer enjoyment of painting a forest scene.
Even though this tutorial might lean towards the advanced side, I encourage you not to be afraid to try it! Remember, my primary advice is to keep practicing and keep painting; the more you work, the better you will understand your brush and how to mix colors. We will be using a limited color palette to ensure you learn how to achieve the desired shades through mixing.
Materials and Preparation
Before we begin, gather your supplies. You can see all the necessary materials on the screen, including the limited five colors and various brushes.

Canvas Size and Type: I am working on a small, square canvas, measuring 10 by 10 inches. This is a smaller format than I typically use.
| Tool/Item | Description/Purpose | Source |
|---|---|---|
| Canvas | Small, 10x10 inch, square | |
| Limited Palette | Five colors (details below) | |
| Large Flat Brush | 1.5 inches (used for initial painting and background) | |
| Medium Flat Brush | Size number 8 (used for background trees and foreground trunk details) | |
| Bristle Flat Brush | Used especially for dry brush effects, blending, tapping technique, and shadows | |
| Liner Brush | Used for detailed branches and smaller lines | |
| Smallest Flat Brush | Used for fine detail on branches and moss |
Note on Colors: While we are using a limited palette, key colors mentioned in the mixing process include Yellow, Blue, Red, White, and Raw Umber.
For more detailed information on acrylic painting supplies, you can check out resources on the John Magne Lisondra website: Acrylic Painting Materials (External Link).
Step-by-Step Tutorial: Painting the Forest
Step 1: Planning the Scene and Sketching Major Trees
We begin by establishing the subject and light source. My subject today is trees in the forest.
- Locate the Sun: I’m going to place the sun and sun rays either near the center or slightly to the side.
- Sketch the Main Trees: Using the medium size flat brush, we will sketch the two major big trees. I’m placing one huge tree here and a second tree next to it. These sketches define the central elements of the composition.
Step 2: Underpainting the Background and Distant Foliage
We will now start with the backgrounds. This is a crucial step for establishing the deep, greenish atmosphere of the forest interior. I’m using the 1.5 inch flat brush for this process.
- The Light Area: We need to lighten the area where the sun will be. Mix blue, yellow, red (to achieve a slight orange color), and plenty of white. Apply this mixture to the area designated for the sun, making it look glowing.
- The Forest Green: Since this is inside the forest, the overall tone should be much more greenish. Mix blue, yellow, and white.
- Adding Distant Trees: Use the medium size flat brush number eight to add trees in the background. Mix raw umber, white, and blue, making sure to make these background trees darker. Add more trees in the background, making them appear subtle.
Step 3: Creating the Sun, Mist, and Atmospheric Effects
This stage focuses on creating the illusion of glowing light and mist.
- Clean Your Brush: Ensure your brush is clean.
- The Glowing Sun: Use white with yellow to apply paint in the area of the sun to create a glowing effect.
- Misty Effects and Blending: Use the dry brush technique (make sure your brush is dry!). For blending, you can use the bristle flat brush. Mix a reddish purple (blue and red) and add white. This helps create mistiness around the light source.
- Distant Highlights: Use white and yellow to add highlights to the trees in the distance that are hit by the sunlight.
Step 4: Developing the Main Tree Trunks and Branches
Now we focus on the central trees. For the dark colors, remember: I am not using any black paint. My dark color mix—my "black"—will be a combination of blue, red (or dark purple), and raw umber.
- Dark Trunk Base: Apply the dark color mixture (blue, red, raw umber) to the main tree trunks.
- Adding Branches: Switch to the liner brush to put in a lot of branches. An important detail: the more branches you can put, the better, as this helps make the whole thing look realistic.
- Adding Moss and Trunk Texture: Apply mossy green details using yellow, blue, and a little red. Use raw umber and red, yellow umber to create darker, more textured areas, especially where there might be moss. You can add more blue and white to lighten certain parts of the trunk.
Step 5: Applying Leaves and Moss (The Tapping Technique)
We use the tapping technique extensively here to simulate foliage and moss.
- Initial Leaves: Use the bristle flat brush. Tap dark leaves using blue, red (to darken), and yellow.
- Greener Foliage: Use yellow and blue, adding more yellow and white to create lighter, greenish leaves. For darker greens, mix yellow, blue, a bit of red, and white.
- Moss on Trunks: Since this tree is inside the forest, there will be a lot of moss. We use tapping on the trunk itself to create this texture. Use yellowish-green moss. You can use raw umber to ensure some of the moss looks dark.
Step 6: Highlighting and Creating Sun Strikes (Light Rays)
The light rays striking through the trees are a key element of this painting.
- Light Ray Mix (Purple Tone): Use the bristle flat brush and a dry brush technique. Mix blue and red (a reddish purple) with white. Apply this mixture where the light hits.
- Changing the Light Color: Change the color to a warmer tone using yellow, white, and a little bit of red. Apply this striking light across the composition. The light should look very strong, illuminating the trees.
- Foreground Grasses: To make the bottom of the scene look bright—these are the grasses—use white and yellow, applying with the tapping technique to create highlights.
Step 7: Detailing the Foreground Tree
We will now work on the very large tree positioned in front of us.
- Trunk Color: Use the medium size flat brush. Mix blue, red, umber, and some yellow. Apply this with a tapping technique for texture.
- Foreground Branches: Use the smallest flat brush. Add more branches (blue, raw umber, red). Again, the more branches, the more realistic the tree will look.
- Moss and Lights: Use yellow and blue to create prominent greens for the moss. Add a slight touch of light bluish purple to create small highlights on the trunk.
For more tips on achieving realistic tree textures, consult this resource: Learning Acrylic Painting Techniques (External Link).
Step 8: Final Touches, Shadows, and Highlights
To finalize the painting, we need to add depth using cast shadows and brilliant highlights.
- Cast Shadows: Use the bristle flat brush for the cast shadows and dark shades on the bottom part of the painting. Use the tapping technique. Mix raw umber, blue, and yellow.
- Dark Bushes: Add dark greens for bushes using blue, yellow, red, and raw umber, applied with the tapping technique.
- Brilliant Highlights: Add final highlights using yellow, tapping over the dark areas. The use of yellow can make areas look like flowers or glowing bushes. Mix yellow with blue and white for bright, final greens.
The final result should look simple yet wonderful, with lights focusing from one part and hitting other areas, creating beautiful highlights and shadows. I completed this small canvas in about 1 hour and 10 minutes.
I love how the light is very clear now, showing exactly where the sun came from. The focused light striking the forest floor and trunks creates a realistic and striking image.
Keep on practicing! The continuous effort is how you master color mixing and brushwork.
Further Learning Opportunities

If you want to continue your journey into landscape painting, explore other tutorials on this site for essential techniques like Creating Depth and Perspective (Internal Link) or Mastering the Limited Palette (Internal Link).
Once again, thank you for watching, and I hope you found something useful in this tutorial. Please hit like, leave some comments, and subscribe for more videos in the future.
To visualize the complex interplay of light in this painting, think of the forest like a stained-glass window. The dense trees and dark shadows act like the metal framework, containing the intense, glowing white and yellow light that pours through, giving specific form and color to everything it touches.
Become my Patron: https://www.patreon.com/jmlisondra
Leave a Reply to @AnushaTK-ku3vh Cancel reply
10 comments on “Step by Step TUTORIAL : Acrylic Landscape Painting / Trees in Forest with Sun Rays / JMLisondra”


About the Artist


😮 amazing
Cool how you started with the Sun
Cool way to blend
superbe !
👍🏼👍🏼👍🏼
Прекрасни стари дървета!
Congratulations, that's perfect.
Hello , 80 likes for this excellent sharing see you later my friend have a great day
Preciosa pintura 😊
Wonderful painting ❤I love this so much ❤Beautiful ❤Thanks ❤❤❤❤❤❤❤❤❤❤❤❤❤❤