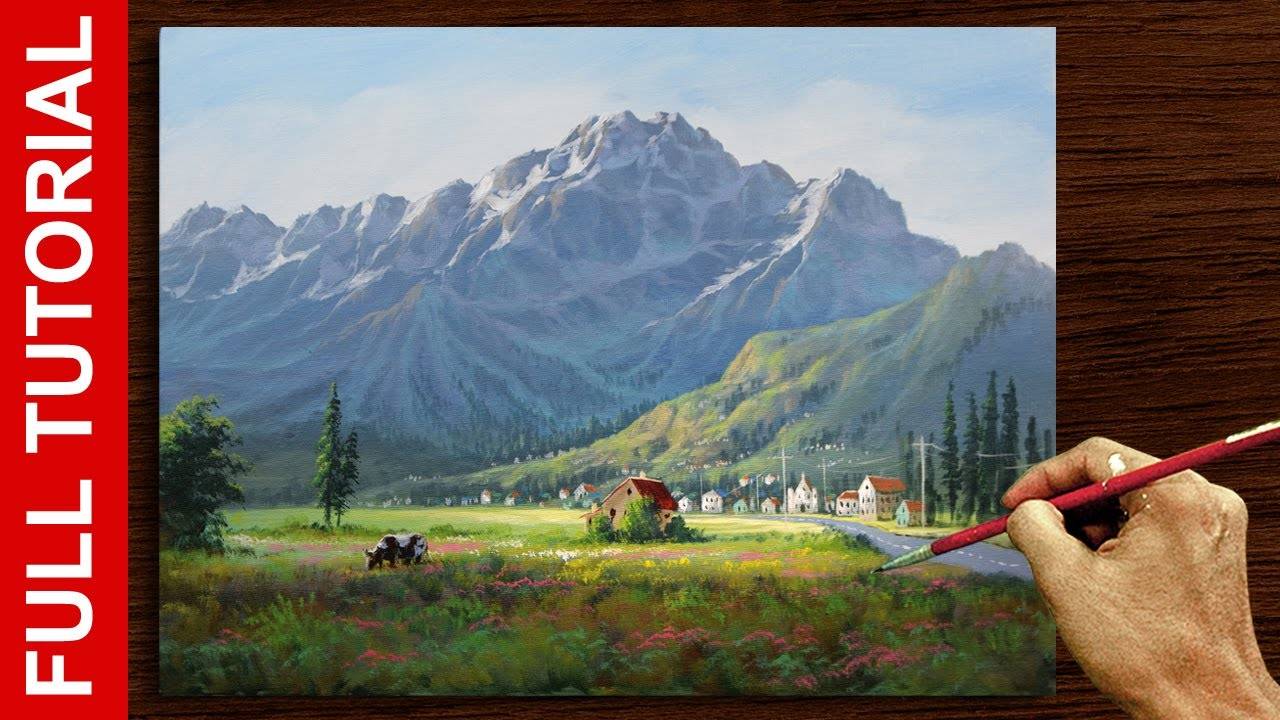
Landscape Painting Small Town-ACRYLIC TUTORIAL
Master the Art of Landscape Painting: A Step-by-Step Guide to a Snowy Small Town Scene with JMLisondra
Are you ready to dive into the beautiful world of landscape painting? In this comprehensive step-by-step landscape painting tutorial, we'll recreate a stunning small town scene nestled against a majestic snow-capped mountain range. This guide is inspired by the insightful live painting session with acclaimed artist John Magne Lisondra (JMLisondra), a self-taught artist with 25 years of experience.
JMLisondra emphasizes that anyone can learn to paint, and the key is consistent practice and understanding color mixing. This particular subject, a painting small town with a snow mountain, is purely imaginative, allowing for creative freedom.
Materials You'll Need:
- Canvas: 30 x 40 cm (12 x 16 inches).
- Limited Color Palette (Acrylics): John uses five limited colors, which is highly recommended for beginners to learn color mixing.
- Titanium white
- Phthalo Blue / Ultramarine Blue / Primary Blue
- Brilliant Red / Primary Red / Cadmium Red
- Medium Yellow / Primary Yellow
- Raw Umber / Burnt Umber / Burnt Sienna
- Buy Acrylic Paints - available in amazon
- Brushes: A variety of brushes, including a big flat brush (1.5 inches), medium and smaller flat brushes, and the smallest liner brush.
- Number 12 Nylon Flat Brush (Long Handle)
- Number 8 Nylon Flat Brush (Long Handle)
- Number 7 Nylon Flat Brush (Short Handle)
- Number 3 Nylon Flat Brush (Short Handle)
- Number 0 Nylon Liner Brush or Round Brush
or No. 1, 00, 000 (Short Handle)
Buy Brushes- available in amazon
- Water: For thinning paint.
- Water Spray: To keep paints wet.
- Glass Palette: Recommended for keeping acrylics wet longer, especially if working in an air-conditioned studio.
The Step-by-Step Landscape Painting Tutorial:
Let's begin our artistic journey!
Step 1: Setting the Sky and Initial Mountain Forms

Start by preparing your canvas. John uses a 1.5-inch big flat brush for this initial stage.
- Sky and Clouds: Mix blue, red, and white on your palette. Add more red to get a fuller umber color, then some blue and white for the sky. You can leave the clouds less defined at this stage.
- Mountain Base: Using the same colors (blue, red, white), begin to define the general shape of your snow mountain at the top of your canvas, planning for a "western landscape" feel.
Step 2: Establishing the Ground and Lower Mountain Layers

Next, define the ground area where your small town painting will reside.
- Ground Line: Create a straight line for the ground, envisioning where your town will be placed.
- Initial Ground Colors: Mix yellow and blue to create greens. Incorporate a little red, raw umber, blue, and white to lay down the foundational colors for the ground and lower mountain parts. John notes that he typically lowers this ground part slightly.
Step 3: Developing the Mountain Ranges and Contours
Now, switch to a medium-sized flat brush for smaller details. This is where the imaginative aspect of the landscape painting truly shines.
- Mountain Rings: Use a mixture of umber, blue, red, and white to define the mountain ranges.
- Adding Light Purple for Depth: Introduce a light purple (blue and red with more red, then white) to create details for the snowy parts on the dark side of the mountains. This also helps define contours and forms. John suggests using raw umber to create a gray stone effect.
- Visualizing Forms: When placing these colors, try to visualize where ridges and forms would naturally appear, almost randomly but with a sense of structure. Don't overdo it.
Step 4: Applying Snow Highlights and Defining Light Source

Transition to a smaller flat brush (Number 3 or 4) and pure white paint.
- Snow Placement: Apply pure white to represent the snow. It's crucial to establish a consistent light source. In this tutorial, the highlights are coming from the left side, meaning all your snow and bright areas should reflect this direction.
- Practice and Observation: John emphasizes visualizing where the snow would naturally accumulate and how light would hit it. He shares how his early mountains looked like "crashing waves" due to uniform application, highlighting the importance of practice and learning to see differences. Don't be afraid if it's not perfect initially; practice is key to growth.
Step 5: Refining Snow and Adding Distant Vegetation
- Darker Snow: For snow on the darker side of the mountain, use a mix of blue and white to create a light blue.
- Distant Vegetation: Introduce bluish-green (blue, a little yellow, and white) to represent far-off vegetation, enhancing the depth of your landscape painting.
Step 6: Introducing Pine Trees

Now, let's add some evergreen elements to the landscape.
- Pine Tree Color: Use blue, red, yellow, blue, umber, and white to create the color for your pine trees. Note that John doesn't use black; he creates darks with purple mixes.
- Placement: Place pine trees along the base of the mountains and in areas where they might cover parts of the mountain. Adding some trees closer to the foreground requires a greener color (yellow and blue, more blue, red, then white).
- Acrylic Advantage: Acrylics dry quickly, which makes it easier to layer and make changes.
Step 7: Drafting the Small Town Buildings

This is where your painting small town comes to life. Zoom in for precision!
- Drafting Houses: Using the smallest liner brush and raw umber mixed with white, draft small square shapes for the houses in the distance. These are simple forms at first, like a small city or village.
- Pure White Roofs: Apply pure white for some roofs.
- Varied Roof Colors: Add orange, green (blue, yellow, white), and even blue for different roof colors.
- Windows: Use umber and blue for windows.
Step 8: Adding the Road and Closer Structures
- The Road: Lighten a part of the field using yellow and white with a medium flat brush, then use blue, red (for purple), and white to create a road.
- Closer Houses: For houses very near to the viewer, make them larger and add details. Use raw umber with white for the main structure, and dark brown or red for the roofs.
- Foreground Trees: Add trees (blue, umber, red, greens with yellow) around these closer houses to cover parts and add depth.
Step 9: Adding Details and Textures
This stage is all about refining the scene.
- Chimneys: Use yellow, red (to make orange), and white for chimneys.
- Road Details: Add white lines and thick posts along the road.
- Plants and Grasses: Add random plants and grass textures using various brushes. Don't always use green for grass; incorporate browns and reddish-browns, yellow, and orange for variety.
- Palette Tip: If using a glass palette, it helps keep paints wet, especially in air-conditioned environments.
Step 10: Introducing Flowers and Focal Points

- Grassland Highlights: Add light green highlights to the grasses and pine trees to create different types of plants.
- Abstract Elements: Introduce orange or light browns randomly to create abstract, yet visually pleasing, elements in the foreground.
- Focal Point: John aims for a bright area in the painting as his focal point.
- Flowers: Use yellow and white for some flower-like effects. For pink flowers, mix red and white. Apply these sparingly to avoid overdoing it.
Step 11: Optional Animals and Final Retouching

- Adding Animals (Optional): If you feel adventurous, you can add animals like a cow using raw umber, white, and stripes.
- Intensify Light: Use yellow, red, blue, and white to lighten parts of the mountain and pine trees that are hit by the light, emphasizing the light source.
- Refinement: Continue adding more details. Retouching creates depth and drama. John advises spending more time on your art, even days for serious work, to refine everything. Practice makes you faster over time.
Key Takeaways from JMLisondra:
- Practice, Practice, Practice: John has been painting for 25 years, and everything he does is a product of continuous practice. Don't be discouraged if your initial attempts aren't perfect; every painting is a learning experience.
- Limited Colors for Learning: For beginners, sticking to five limited colors is essential for learning how to mix any color you need without buying dozens of tubes.
- Visualize and Plan: While painting, especially without a reference, try to visualize how elements should look, where light hits, and how forms interact. You are the master of your painting.
- Don't Be Afraid to Try: Even if a painting looks complicated, try it. You'll learn valuable techniques like blending, painting mountains, depicting light, and creating houses and fields.
- Time and Retouching: Spend ample time on your artwork. Retouching and refining details are crucial for making your painting look good and creating depth.
Support John Magne Lisondra's Artistic Journey:
John is a dedicated artist who shares his knowledge to help others learn. You can support his work and access more exclusive content:
- Patreon: Join his Patreon community at patreon.com/jmlisondra for exclusive lessons and to support his YouTube journey.
- Website: Explore his older and other works by visiting his website at www.jmlisondra.com.
- YouTube: Subscribe to his channel, hit the bell button for notifications, like his videos, and share them to help YouTube recommend his content to others. You can also comment questions in the chat box during live sessions. You can share your painted works on his Facebook page or group, or via email.
This landscape painting project, while looking intricate, is a fantastic learning experience for artists of all levels. Keep practicing, and most importantly, have fun!
Leave a Reply
2 comments on “Landscape Painting Small Town-ACRYLIC TUTORIAL”


About the Artist


Serene and lovely
Thank u very very very much from Russia❤❤❤❤❤❤❤❤❤❤❤❤❤❤❤❤❤❤❤❤❤
U talented n kind person . thank u!!!!!!!!!!!