
No products in the basket.
Acrylic Painting Lesson – How to Paint Tree Leaves in 21 Minutes by JMLisondra
Mastering the Illusion of Nature: A Step-by-Step Acrylic Tutorial on How to Paint Tree Leaves
Hello, aspiring artists! This is a dedicated guide drawn from the expertise of John Magne Lisondra (JMLisondra), demonstrating an approach to one of the most intriguing and challenging aspects of landscape art: how to paint tree leaves. If you’ve ever struggled with creating convincing foliage and texture, you know that tree leaves painting can be tricky. This is because achieving the proper effect or texture requires significant experience and more practice in handling the brush. But fear not—we are going to break down this process using acrylic paints, focusing specifically on achieving that crucial depth and dynamic leaf structure.
Our goal today is to show you precisely how to paint leaves on a tree using fundamental materials and a targeted application technique. We will be using water as our medium, which helps thin the acrylic paint so it’s not hard to apply onto the canvas.
Essential Materials for Tree Leaves Painting
Before we dive into the artistic application of paint, let’s ensure you have the proper tools at your paint pallet. We are using Reeves acrylic paint for this demonstration.
The Palette: The Colors You Need
To successfully paint tree foliage and structure, you will need a selection of core colors:
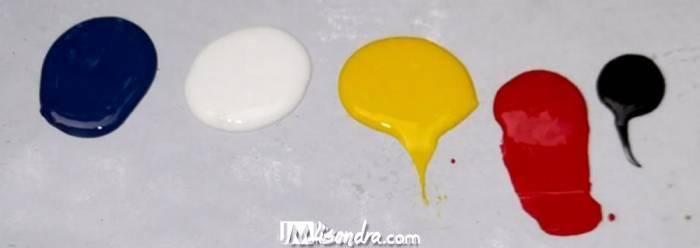
- Titanium White
- Phthalo Blue
- Medium Yellow
- Brilliant Red
- Lamp Black
- Burnt Sienna
Recommended art materials available in Amazon.
The Brushes: Precision and Texture
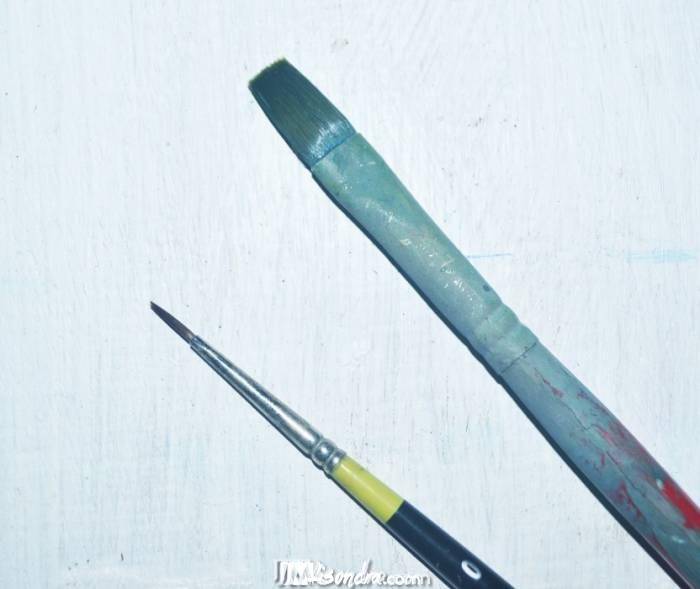
The choice of brush is critical, especially when focusing on how to paint tree leaves. We utilize two specific types of brushes for the trunk and the foliage:
- Round Pointed Brush, Number 0: This small brush is designated for details, specifically for painting the branches of the tree. It is essential because the pointed brush will create the very small, thin lines needed for the delicate structure of the branches.
- Flat Brush, Number 7: This brush is designated specifically for the leaves. A new brush can be used for the tree leaves effect.
The Medium
We use water as a medium. This simple addition is vital, as it works to thin the paint, ensuring the acrylic is wet and “flowy,” which prevents it from being hard to apply onto the canvas.
Step 1: Establishing the Tree Structure (Trunks and Branches)
To begin our journey into tree leaves painting, we must first establish the solid base upon which the foliage will sit. We start with the tree branches and trunks.
For this initial stage, combine Lamp Black and Burnt Sienna. You will use the Number 0 round pointed brush for this task. This small, pointed brush allows you to sketch the branches.
Tip on Consistency: If you find that the paint mix is hard, you must dip the brush into the water. Use just a little amount of water, enough to make the paint wet and flowy. The goal here is to carefully create the foundational lines; the pointed brush ensures these lines are small and precise, perfectly suited for detailed branches.
Step 2: Preparing the Background Foliage (The Dark Foundation)
This step is critical for successful how to paint leaves on a tree, as it establishes the necessary depth and serves as the background layer.
- Prepare the Leaf Brush: We transition now to the Number 7 flat brush, which is dedicated to the foliage. Before mixing your colors, dip the flat brush into the water to make it a little wet. Clean the brush of any excess drops.
- Mix the Dark Green: To create the foundational dark green color, you will mix blue, yellow, and red. This mixture yields the dark green needed for the background.
- Crucial Rule for Tree Leaves Painting: Remember this fundamental rule: Always start the tree leaves with the dark color or dark green. This dark layer is essential; it serves as the necessary background against which subsequent, lighter layers will provide contrast and form.
- Applying Consistency: Again, ensure your paint is flowy. If the acrylic paint feels hard on your new Number 7 flat brush, dip it into the water to make it wet and flowy.
Step 3: Mastering the Textured Leaf Effect
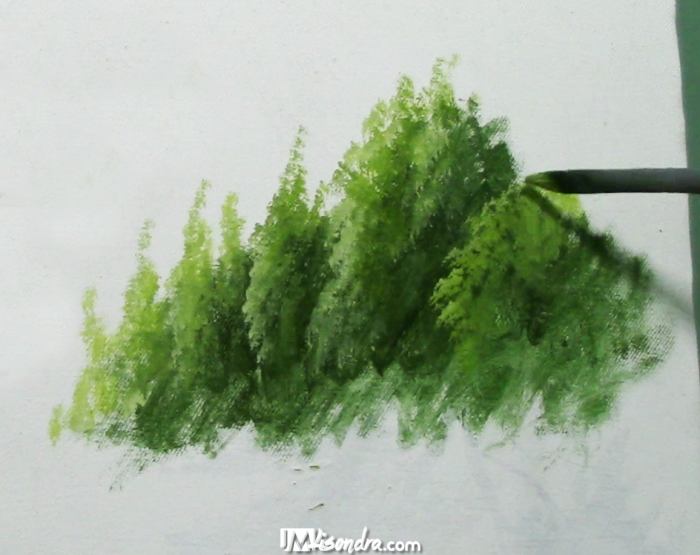
Now we come to the most important part of how to paint tree leaves: applying the texture. This is where that practice in brush handling comes into play.
Using the dark green mixture you prepared, apply the paint carefully and quickly. You must observe the action closely: the technique involves carefully and quickly creating the desired effect or texture.
The specific application technique used here involves what are referred to as dotted light strokes. Though the application must be quick, you must remain careful to capture the right effect. You are essentially applying these textured strokes to the canvas, starting from one point. Remember, you are building this texture upon the background you just created, which must always begin with that dark color.
Enhancing Your Acrylic Tree Painting Practice
Successfully learning how to paint tree leaves is a process that relies heavily on consistency and technique.
- Focus on Paint Thinning: A key insight from this approach is the consistent use of water to thin the acrylic paint. If the paint is too hard, it becomes difficult to apply effectively to the canvas. By ensuring the paint is wet and flowy, you maintain the ability to quickly and carefully apply the dotted light strokes that define the texture of the leaves.
- The Importance of the Background: Never underestimate the foundational dark layer. When you paint tree foliage, that initial layer of dark green serves a vital purpose. It provides the necessary contrast and shadow, ensuring that when you apply subsequent layers (not covered in this specific foundational lesson, but implied by the “dotted light strokes” technique), the foliage will appear dimensional rather than flat.
- Brush Handling for Texture: Practice the quick, delicate movements required for the dotted light strokes. This specific method, using the flat brush, is what ultimately creates the effect and texture that makes the tree leaves look realistic.
By focusing on these materials, understanding the necessity of starting dark, and dedicating practice to the careful yet quick application of the dotted light strokes, you can significantly enhance your ability to master tree leaves painting. Remember to keep your paint flowy using water, and always begin your leaf structure with the background dark green.
FINAL RESULTS:

I created a website focusing on FREE PAINTING TUTORIALS, you can check the link.
Do you want to check the step by step lesson of this with photos? Check here.
Do you want to learn more basic lessons on acrylic painting? You can check my level 1- acrylic painting tutorials here.



Ana Real says:
Está um espetáculo de trabalho parabéns
patricia andersen says:
Awesome so realistic. Thank you so much for your help.
CzasTOWyrecytować says:
nice😊
Red & Blue says:
Thanks
María Del Carmen Quiróz says:
Arbolito y arbustos?
María Del Carmen Quiróz says:
Cómo es el movimiento de la pincellada para el secreto de las hojitas muy bonitas?
T P says:
Appreciate you for doing this tutorial. I learn so much every time I watch your video. Thank you so much!
Zineide Salomé says:
🇧🇷🇧🇷🇧🇷🇧🇷
Tabitha Gabriel says:
Love this
Dennis Cocker says:
Excellent,informative video.Can’t wait to try it
Christine the Crafter says:
I would really love paint landscapeslike you do…
Firoz Alam says:
He is a Magician
And his paint brush is his magical wand…
kitty kat says:
So beautiful. Does it matter what kind of paint ? I get mine from the dollar store and my bf says that paint sucks… he went to art school but he isnt a painter
Art of John Magne Lisondra says:
Depends on the brand… I used liquitex basics, pebeo studio, sakura
Angel Cazorla says:
Wow, I looks amazing! You are a great teacher. Thank you very much ;)
Julie Jeffery says:
You are very talented. Lovely trees
María Ramírez says:
Buen video gracias 👌
Myfaith love says:
Omg why you taking so long 🤔
Inacia Monteiro gomes says:
Emuito legal muito obrigada
Explore Imagine Create #art says:
Great! Thanks 😀
Samina Zakia says:
Thank you for giving us tips. I want to ask, if I have done my oil painting and it is already dry. Now I feel I need to highlight some parts. Is it possible on dry painting to do touchups
Thanks in advance
Samina Zakia says:
@Art of John Magne Lisondra oh great! I will borrow some tips from your this video tutorial and add in mine. My hobby is painting. I do once in a while. Thanks a lot.
Art of John Magne Lisondra says:
Yes i also do that with oil painting.