Acrylic Painting Lesson - How to Paint Tree Leaves in 21 Minutes by JMLisondra
Mastering the Illusion of Nature: A Step-by-Step Acrylic Tutorial on How to Paint Tree Leaves
Hello, aspiring artists! This is a dedicated guide drawn from the expertise of John Magne Lisondra (JMLisondra), demonstrating an approach to one of the most intriguing and challenging aspects of landscape art: how to paint tree leaves. If you’ve ever struggled with creating convincing foliage and texture, you know that tree leaves painting can be tricky. This is because achieving the proper effect or texture requires significant experience and more practice in handling the brush. But fear not—we are going to break down this process using acrylic paints, focusing specifically on achieving that crucial depth and dynamic leaf structure.
Our goal today is to show you precisely how to paint leaves on a tree using fundamental materials and a targeted application technique. We will be using water as our medium, which helps thin the acrylic paint so it’s not hard to apply onto the canvas.
Essential Materials for Tree Leaves Painting
Before we dive into the artistic application of paint, let’s ensure you have the proper tools at your paint pallet. We are using Reeves acrylic paint for this demonstration.
The Palette: The Colors You Need
To successfully paint tree foliage and structure, you will need a selection of core colors:

- Titanium White
- Phthalo Blue
- Medium Yellow
- Brilliant Red
- Lamp Black
- Burnt Sienna
Recommended art materials available in Amazon.
The Brushes: Precision and Texture

The choice of brush is critical, especially when focusing on how to paint tree leaves. We utilize two specific types of brushes for the trunk and the foliage:
- Round Pointed Brush, Number 0: This small brush is designated for details, specifically for painting the branches of the tree. It is essential because the pointed brush will create the very small, thin lines needed for the delicate structure of the branches.
- Flat Brush, Number 7: This brush is designated specifically for the leaves. A new brush can be used for the tree leaves effect.
The Medium
We use water as a medium. This simple addition is vital, as it works to thin the paint, ensuring the acrylic is wet and "flowy," which prevents it from being hard to apply onto the canvas.
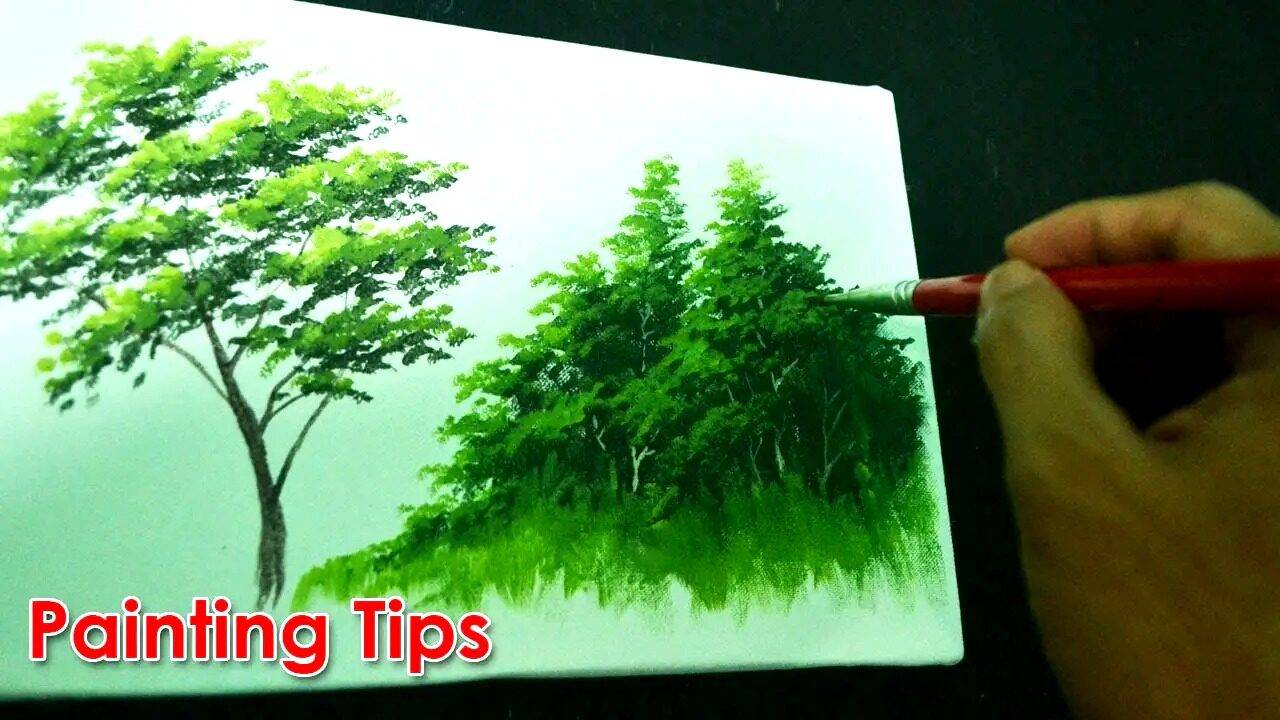
Step 1: Establishing the Tree Structure (Trunks and Branches)
To begin our journey into tree leaves painting, we must first establish the solid base upon which the foliage will sit. We start with the tree branches and trunks.
For this initial stage, combine Lamp Black and Burnt Sienna. You will use the Number 0 round pointed brush for this task. This small, pointed brush allows you to sketch the branches.
Tip on Consistency: If you find that the paint mix is hard, you must dip the brush into the water. Use just a little amount of water, enough to make the paint wet and flowy. The goal here is to carefully create the foundational lines; the pointed brush ensures these lines are small and precise, perfectly suited for detailed branches.
Step 2: Preparing the Background Foliage (The Dark Foundation)
This step is critical for successful how to paint leaves on a tree, as it establishes the necessary depth and serves as the background layer.
- Prepare the Leaf Brush: We transition now to the Number 7 flat brush, which is dedicated to the foliage. Before mixing your colors, dip the flat brush into the water to make it a little wet. Clean the brush of any excess drops.
- Mix the Dark Green: To create the foundational dark green color, you will mix blue, yellow, and red. This mixture yields the dark green needed for the background.
- Crucial Rule for Tree Leaves Painting: Remember this fundamental rule: Always start the tree leaves with the dark color or dark green. This dark layer is essential; it serves as the necessary background against which subsequent, lighter layers will provide contrast and form.
- Applying Consistency: Again, ensure your paint is flowy. If the acrylic paint feels hard on your new Number 7 flat brush, dip it into the water to make it wet and flowy.
Step 3: Mastering the Textured Leaf Effect
Now we come to the most important part of how to paint tree leaves: applying the texture. This is where that practice in brush handling comes into play.
Using the dark green mixture you prepared, apply the paint carefully and quickly. You must observe the action closely: the technique involves carefully and quickly creating the desired effect or texture.
The specific application technique used here involves what are referred to as dotted light strokes. Though the application must be quick, you must remain careful to capture the right effect. You are essentially applying these textured strokes to the canvas, starting from one point. Remember, you are building this texture upon the background you just created, which must always begin with that dark color.
Enhancing Your Acrylic Tree Painting Practice
Successfully learning how to paint tree leaves is a process that relies heavily on consistency and technique.
- Focus on Paint Thinning: A key insight from this approach is the consistent use of water to thin the acrylic paint. If the paint is too hard, it becomes difficult to apply effectively to the canvas. By ensuring the paint is wet and flowy, you maintain the ability to quickly and carefully apply the dotted light strokes that define the texture of the leaves.
- The Importance of the Background: Never underestimate the foundational dark layer. When you paint tree foliage, that initial layer of dark green serves a vital purpose. It provides the necessary contrast and shadow, ensuring that when you apply subsequent layers (not covered in this specific foundational lesson, but implied by the "dotted light strokes" technique), the foliage will appear dimensional rather than flat.
- Brush Handling for Texture: Practice the quick, delicate movements required for the dotted light strokes. This specific method, using the flat brush, is what ultimately creates the effect and texture that makes the tree leaves look realistic.
By focusing on these materials, understanding the necessity of starting dark, and dedicating practice to the careful yet quick application of the dotted light strokes, you can significantly enhance your ability to master tree leaves painting. Remember to keep your paint flowy using water, and always begin your leaf structure with the background dark green.
FINAL RESULTS:


I created a website focusing on FREE PAINTING TUTORIALS, you can check the link.
Do you want to check the step by step lesson of this with photos? Check here.
Do you want to learn more basic lessons on acrylic painting? You can check my level 1- acrylic painting tutorials here.
Leave a Reply to Chris Boonzaier Cancel reply
408 comments on “Acrylic Painting Lesson - How to Paint Tree Leaves in 21 Minutes by JMLisondra”


About the Artist


Thank You. Reallly great work. Much appreciated.
I love painting trees! You have amazing skill! Thanks for sharing your beautiful work.
you're welcome McCallie.. thank you :)
have to watch this over over again. on actual paintaing sa canvas mahirap pala talaga halamaan at trees. sir jm may m recommend ka ba n pwedeng pag paractisan mag painting ng acrilic bukod sa canvas. kailngan ma master muna stokes ng tress at plants. thanks 👍👍
gamit ka muna ng tag board.. mura lang yan at maganda din sa practice... kulay brown un tapos lagyan mo ng 2 coats ng white acrylic paint para di mag absorb ng pintura...
Great demonstration... thanks for share it.
Excellent. You are the one I want to learn from as a beginner. You speak like you are a Visayan from the Philippines, are you?
Great video! What type of brush are you using for the leaf and bush effect? And are you using heavy body acrylic or regular?
I'm just using a flat nylon brush... it's student grade acrylics... Reeves and Liquitex basics..
U
Thank You for a easy to follow video. I will be watching all of your videos.
you're welcome Betty Ann.. thank you very much!
thank you! great help and inspiration.. where are you based?
Helen Chua I
you're welcome Helen and thank you.. I am from the Philippines..
thank you for teaching colors. I successfully made a tree using your colors. will save lots money in future. I need lots practice. trying to do this tree. next time ill follow while painting. I like this style. but I always over do. oops
thank you Deana.. Just keep on learning and practicing.. :)
thank u for tree lesson. in going to try something like this my next painting time. I think I understand more about not over doing and light source..thank u much.
that's great! keep learning.. I am really glad.. thank you very much!
PARABÉNS JOHN MAGNE LISONDRA, É TUDO MUITO BONITO PARA QUE ENTENDEM TINTAS. EU GOSTARIA DE APRENDER PARA A SUA PRIMEIRA E MAIS FÁCIL E SIMPLE VIDEOS PASSO A PASSO PARA QUEM NUNCA MOVIDO EM TINTAS FAZER O NÚMERO 1º-) VÍDEO SOBRE, PARA LIVRE "PORTANTO DOU O DA GRAÇA QUE VOCÊ RECEBE DO SENHOR" QUE LHE DEU ESTE PRESENTE. EU TENHO TINTAS, PINCÉIS CAVALETES E ETC. I PASSOU ANOS ESTUDANDO COM MUITAS PESSOAS, PRATICANDO MUITO, SEMPRE ACOMPANHADO, MAS NUNCA PODERIA PINTAR UMA PAISAGEM AINDA MAIS SIMPLES SOZINHO. PARA GENTILEZA, AJUDE-ME, EU NÃO TENHO CONDIÇÕES A VER COM O PROFESSORES E MUITO MENOS PARA COMPRAR VÍDEOS, ETC, LIÇÕES NA INTERNET. "BEM-AVENTURADOS OS MISERICORDIOSOS, PORQUE ESSAS EMPRESAS A REALIZAÇÃO DE MISERICÓRDIA;" MATEUS 5: 7 NÃO VOCÊ QUER UMA MISÉRIA DE DEUS ENSINANDO AS NECESSIDADES? 813/5000 PARABÉNS JOHN MAGNE LISONDRA, É MUITO BONITO PARA AQUELES QUE ENTENDEM TINTAS. EU GOSTARIA DE APRENDER DO SEU SIMPLES PASSO PRIMEIRO E SIMPLES A PASSO PARA VIDEO QUE JÁ TOMOU EM TINTAS DESDE O PRIMEIRO) VÍDEO SOBRE, PARA LIVRE "EU DOU GRAÇA O QUE RECEBER DO SENHOR", QUE DEU ESTE PRESENTE. EU TENHO TINTAS, CAVALOS, E ASSIM. I PASSOU ANOS ESTUDANDO COM AS PESSOAS DIFERENTES, EU PRÁTICA MUITO, SEMPRE ACOMPANHAVA, MAS EU NUNCA PODERIA PINTAR ALONE A PAISAGEM SIMPLY. POR FAVOR ME AJUDE, EU NÃO POSSO FAZER CURSOS COM OS PROFESSORES AQUI, SOZINHO VAMOS COMPRAR VIDEOS, LIÇÕES, ETC NA INTERNET. "BEM-AVENTURADOS OS MISERICORDIOSOS, PORQUE ELES ALCANÇARÃO MISERICÓRDIA;" MATEUS 5: 7 VOCÊ NÃO QUER A MISÉRIA DE DEUS ENSINANDO AS NECESSIDADES? ESTÁ DANDO QUE RECEBE.
Você é bem-vindo e muito obrigado pelo seu comentário maravilhoso .. :) Eu realmente aprecio isso.
GREAT JOB !!
😀thanks.... I like painting...
Thank you
Thank you for video .You are a big talent and a good teacher. I have learned a lot.Maybe I'll paint many nice landscapes too.
you're always welcome :)
I love ❤️ this painting I got 1 🥇rank by doing daily I made a hobby and now I am dented by a painting drawing class thank you now I am in state level 🙏 said
you're welcome Vahida.. and thank you very much :)
Superb also interesting 👌👌👌👌
lIKE.
Hi. very nice work. may i ask where you bought your no.7 brush?
:) thanks. I'll find one tomorrow. You're a great artist. Hope you'll keep posting more of these amazing masterpieces..
I bought it on local art store. You can substitute it with any nylon flat brush with the same size
Excellent painting.I really enjoyed your art.